| Back to Back Issues Page |
 |
|
LCB, Issue #070 --, Handle the Poisoned Pawn Variation with Care April 01, 2021 |
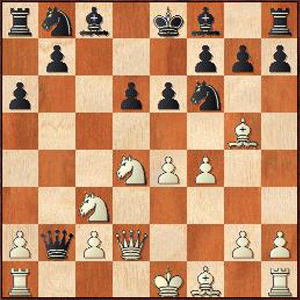
Handle the Poisoned Pawn with CareLapoc Chess Board, Issue #070 -- GOTM #40 learn and play online chess A handful of openings contain a Poisoned Pawn Variation. The b-pawn is sometimes dangled in front of a hungry Queen. The prize looks juicy and the added boon of damaging your opponent's Queenside only adds to the temptation. It's hard to resist picking up the free pawn. However nothing in this world is free. The capture costs you time and compromises your Queen. She will often become a target. Your opponent may use her vulnerability to gain tempi and other forms of compensation. So who comes out on top after the poisoned pawn is accepted? It depends on who plays better and makes the most of the trade off. Let's take a look at a high profile example taken from the legendary Match of the Century played in Reykjavik in 1972. The protagonists are of course Boris Spassky and Bobby Fischer. Handle the Poisoned Pawn with CareSpassky, Boris V - Fischer, Robert J [B97]GotM #40 - Reykjavik, 1972 [Connaughton, Ken] 1.e4 c5 Sicilian Defense 2.Nf3 d6 3.d4 cxd4 4.Nxd4 Nf6 5.Nc3 a6 Najdorf Variation 6.Bg5 e6 7.f4 Qb6 8.Qd2 Qxb2
Poisoned Pawn Variation 9.Nb3 White threatening to surround the Black Queen 9...Qa3 10.Bxf6 gxf6 11.Be2 h5 Attempting to discourage White from castling Kingside now that Black's own castling options have been compromised. 12.0-0 White is however happy to tuck his King away on this wing. 12...Nc6 13.Kh1 Bd7 14.Nb1 Qb4 Black would be okay with exchanging Queens since his is a target and the White Queen sits comfortably in a central position. 15.Qe3 White would prefer to leave the Queens on. 15...d5
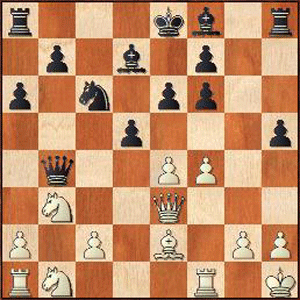
Aggressive but perhaps not the best. 16.exd5 Ne7 17.c4 Nf5 18.Qd3 White's judgement is good in this phase as he maneuvers better than his opponent. 18...h4! Aware of the growing threats, Black decides he needs to develop some counterplay. 19.Bg4 Nd6 20.N1d2 f5 21.a3! White has managed throughout the game to answer Black's threats with bigger threats. 21...Qb6 (21...Qa4+/- would have seen Black still under pressure but perhaps not in quite such a dire circumstance.) 22.c5
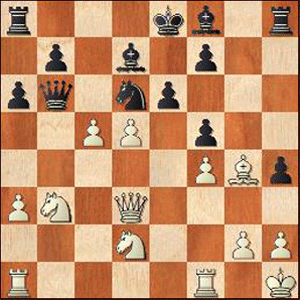
22...Qb5 Again the Queen exchange is offered. 23.Qc3 And again it's rebuffed. 23...fxg4 (23...Rg8+- was the quieter reply, but Fischer was not the quiet kind.) 24.a4 Three Black pieces are now threatened, White has for several moves resisted the temptation of claiming material, always sensing a bigger prize on offer, further down the road. (24.Qxh8+- Nf5 25.Nd4 Nxd4 26.Ne4 0-0-0 27.Qxd4+/- certainly sees White retain an advantage but not as commanding as the one obtained after the text move.; 24.cxd6= of course diminish White's advantage absolutely and immediately.) 24...h3 Black of course, trying to rescue the game, is going for broke now. 25.axb5 hxg2+ 26.Kxg2 Rh3 27.Qf6 Nf5 28.c6
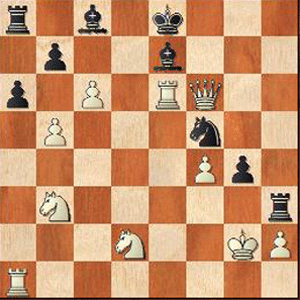
White now has the Queen for a minor piece and a great position. He will now close in on the full point. 28...Bc8 29.dxe6 fxe6 30.Rfe1 Be7 31.Rxe6!
The exchange sacrifice seals the deal. Black throws in the towel. (31.Rxe6 Bxe6 32.Qxe6 bxc6 (32...Rd8 33.Qg8+ Bf8 34.Qg6++-) 33.Qg8++-) 1-0 Spassky - Fischer, Reykjavik, 1972) P.S. If you do not have html based email software and you're using a text only system, you may find that the links are only partially highlighted and may not work. If this is the case, simply copy and paste the entire link into the browser and hit Enter. That should get you where you want to go. Comments, ideas, feedback? I'd be stoked to hear from you. Get in touch See you next month. Ken 
|
| Back to Back Issues Page |