| Back to Back Issues Page |
 |
|
LCB, Issue #079 --, Turn from Prey to Predator January 01, 2022 |
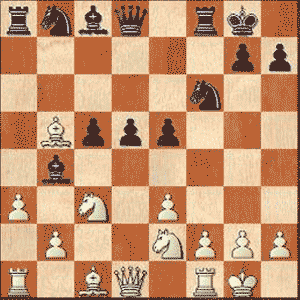
Turn from Prey to PredatorLapoc Chess Board, Issue #079 -- GOTM #49 learn and play online chess The big question with the King is when to transition the piece from fugitive to hunter. Often after the Queen trade and we usually prefer a pair of Rooks to have also left the stage. Good players can sense when the time is right for the King to join the fight. Every now and then a King is pushed into an advance as he flees from a series of checks. That is certainly what happened in this month's game. The game we're going to look at in fact featured many interesting themes like a big pawn center, isolated pawns, material imbalances and a most eye-catching mating net to secure victory in the end. The game was played during a World Championship match in 1978 in Baguio, Philippines. Viktor Kortschnoj had White and Anatoly Karpov had Black. Both Soviet born players but Kortschnoj of course had defected to the west and was at this point playing for Switzerland. Turn from Prey to PredatorKortschnoj, Viktor (2665) - Karpov, Anatoly (2725)[E47]GotM #49 - Baguio, 1978 [Connaughton, Ken] 1.c4 Nf6 2.Nc3 e6 3.d4 Transposing to Queen's Gambit Declined lines. 3...Bb4 Karpov goes with the Nimzo-Indian Defense. 4.e3 Rubinstein System 4...0-0 5.Bd3 c5 Challenging White's center. 6.d5 b5 7.dxe6 fxe6 8.cxb5
Kortschnoj chooses to weaken the threat on the flank but knows that this allows Black to build pressure in the center at some point. 8...a6 9.Nge2 d5 10.0-0 As we move into the middlegame, both players
have developing to do on their respective Queensides and it is here that the next phase of the battle will proceed. 10...e5 11.a3 axb5 12.Bxb5
White gains a passed pawn on a3. (12.axb4? Rxa1-+) 12...Bxc3 13.bxc3 (13.Nxc3 might be followed by something like: 13...Ba6 14.Qe2 Bxb5 15.Nxb5 Na6 16.a4 Nc7 17.Bd2 Nxb5 18.axb5 Rb8 19.Ba5 Qd7 20.b6 Qc6=) 13...Ba6 The intruder on b5 is challenged. 14.Rb1 Qd6 15.c4 White further solidifies his outpost on b5. 15...d4 White's situation on the flank looks good, but Black's incursion in the center is beginning to take shape. 16.Ng3 Preventing
...e4 which would pave the way for ...d3. 16...Nc6 Black has a potential passed pawn on the d-file but he wants to enable the c-pawn to support it. For this reason the obstacle on c4 must be neutralized. 17.a4 Na5 18.Qd3 The Queen comes in to support c4. 18...Qe6
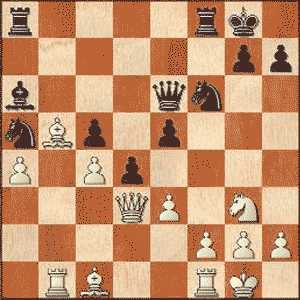
19.exd4 cxd4 Black chooses to support his d-passer from the e-file rather than the c-file. This means that his two pawns can perhaps much more easily roll forward together. On the other hand, he has given White a second passer on the c-file to go with the first on a4. (19...exd4 was rejected as it could have led to something like: 20.Ba3 Qe5 21.Rfe1 Qc7 22.h3 Rf7 23.Ne4 Nxe4 24.Qxe4 Bb7 25.Qe5 Rc8 26.Be8 Rf6 27.Qxc7 Rxc7 28.Rb5 Nxc4 29.Rxc5 Rxc5 30.Bxc5 d3 31.Bh5 Bc6 32.Bd1+/- with White looking stronger.) 20.c5 A push to tie Black's resources down to blockading deep in his own realm. 20...Rfc8 21.f4!? Giving up the c-pawn. What does White want in return? 21...Rxc5 22.Bxa6 White's plan is to simplify. (Also possible was 22.fxe5 Bxb5 23.axb5 Rxe5 24.Qxd4+/- with White's passer on b5 the difference between the two.) 22...Qxa6 23.Qxa6 Rxa6
And now Kortschnoj can move with tempi a couple of times. 24.Ba3 Rd5 25.Nf5 Kf7 26.fxe5 Rxe5 27.Rb5 White has a very dynamic style, often seeking intermediate ideas before taking the
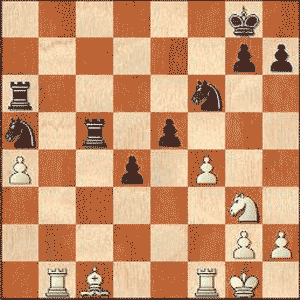
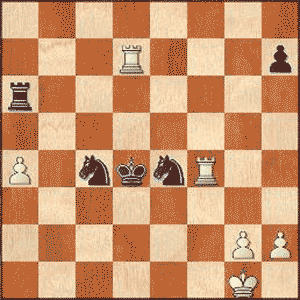
material on offer. 27...Nc4 28.Rb7+ Ke6 29.Nxd4+ Having removed both of Black's central pawns White's future is looking promising. 29...Kd5 30.Nf3 Attacking the Rook to give his Bishop time to escape. 30...Nxa3!
Black decides to take two pieces for the Rook. 31.Nxe5 Kxe5 32.Re7+ Kd4 33.Rxg7 White helps himself to another pawn. Did he have time? 33...Nc4 34.Rf4+ Ne4 35.Rd7+
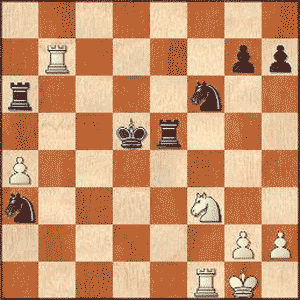
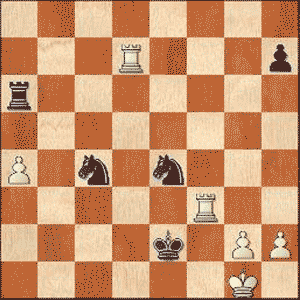
Now White is sensing danger and ignores the last of Black's pawns. 35...Ke3 36.Rf3+ Ke2
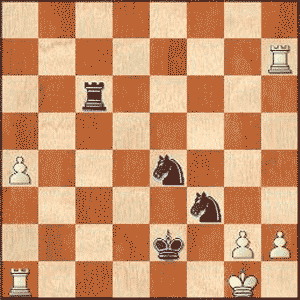
Suddenly the Black King, with his two Knights in close proximity, is looking like a monster. 37.Rxh7 White decides his King is secure enough to warrant the elimination of the last Black pawn. 37...Ncd2 The sharks are circling now. 38.Ra3 White blocks the Black Rook's entry into the attack on the a-file hoping this will be enough to prevent the threat from growing. 38...Rc6 No matter, the Black Rook is coming. 39.Ra1?? The error that seals Black's fate. The King needed g2 to breathe. (39.g3 and the position is even. The game might have continued: 39...Nf3+ 40.Kg2 Ne1+ 41.Kh1 Rf6 42.Ra2+ Kf1 43.Rb7 Nf2+ 44.Rxf2+ Kxf2 45.a5 Ra6=; 39.g4 Nf3+ 40.Kg2 Ne1+ 41.Kg1 Nf3+ 42.Kg2 Ne1+ 43.Kg1=; 39.h3?? would not have worked however: 39...Rc1+ 40.Kh2 Nf1+ 41.Kh1 Nfg3+ 42.Kh2 Rh1#) 39...Nf3+!!
Black's stunning continuation is unanswerable. White resigns as he sees that his King is finished. (39...Nf3+ 40.gxf3 (40.Kh1 Nf2#) 40...Rg6+ 41.Kh1 Nf2#) 1-0 Kortschnoj - Karpov, Baguio (1978) P.S. If you do not have html based email software and you're using a text only system, you may find that the links are only partially highlighted and may not work. If this is the case, simply copy and paste the entire link into the browser and hit Enter. That should get you where you want to go. Comments, ideas, feedback? I'd be stoked to hear from you. Get in touch See you next month. Ken 
|
| Back to Back Issues Page |