| Back to Back Issues Page |
 |
|
LCB, Issue #080 --, Win with a Deep Tactical Strike February 01, 2022 |
Win with a Deep Tactical StrikeLapoc Chess Board, Issue #080 -- GOTM #50 learn and play online chess Even when you have the advantage, it can be difficult to win. Sometimes it takes a clever tactical strike to finish off your opponent. You need to be familiar with a number of ideas in order to develop a tactical eye. Knowledge of things like forks, pins, skewers, discovered attacks and many other ideas will transform your analysis of any position. When you scan for opportunities, your developing tactical acumen will help you spot possibilities you were blind to before. This month's game was contested by Michal Krasenkow of Poland and Kirill Alekseenko of Russia, two strong GMs. The game was played in Sochi, Russia in 2021. These GMs play at a level where basic and even advanced tactical ideas stand out clearly to them. And yet the move that ended the game was so ingenious that masters and students alike would marvel at it's beauty. Win with a Deep Tactical StrikeKrasenkow, Michal (2591) - Alekseenko, Kirill (2699)[E00]GotM #50 - Sochi, 2021 [Connaughton, Ken] 1.Nf3 d5 2.d4 Nf6 3.c4 e6 4.g3 Transposing to the Catalan Opening. 4...Bb4+ 5.Bd2 Be7 6.Bg2 0-0 7.0-0 Nbd7 8.Qc2 c6 9.Rc1 a5 10.a4 Re8 11.Na3 Bd6
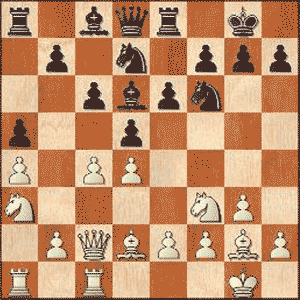
The opening leaves us with a closed position. 12.Bf4 e5 Black decides to open the center. (12...Bxf4 to open up the g-file seems enticing but given the position, Black would have great difficulty to pressurize the White King: 13.gxf4 Nf8 14.Nb1 Ng6 15.e3 Qe7 16.Nbd2 Bd7= with an equal position. The half-open g-file presents at least as many possibilities for White as it does for Black.) 13.dxe5 Nxe5 14.Bxe5 Bxe5 15.cxd5 Nxd5 16.Nxe5 Rxe5
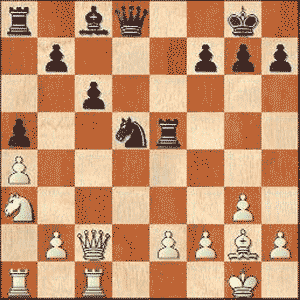
The flurry of exchanges that inevitably followed 12...e5 have changed the terrain. Now the Black pieces can see the enemy camp. 17.Nc4 Re8 18.Rd1 Be6 19.e4 Nb4 Elegantly sidestepping the pin. 20.Qc3 Qc7 21.Nd6 If White can plant his Knight here and turn e6 into an outpost it will be quite the coup for him. 21...Re7 22.e5 Qb6 23.Rd2 Nd5 24.Qc2 Rd7 25.Rad1 Rad8 Getting ready to sacrifice the exchange. That Knight has to go and the supporting pawn will provide additional compensation for the exchange. 26.Rd4 Nb4!? The d6-Knight survives for the moment. (26...Rxd6 27.exd6 Rxd6+/= may have freed Black's position with a Queenside majority to play with for the exchange.) 27.Qc1 h6 28.Rh4 f6 Trying to undermine White's excellent Knight. 29.Rxh6!!
The only way to maintain equality and Black's defense is tricky to find. (29.Qc3 was obviously inadequate.) 29...gxh6 30.Qxh6 Qc7 Strengthening the bare second rank. 31.Qxf6 Bb3 32.Bh3!!
Offering a second Rook in exchange for access to e6. Black would be courageous to accept. 32...Rf8 Black tries to drive the invading Queen out of the red zone. (32...Bxd1?? 33.Be6+ Rf7 34.Nxf7 Qxe5 35.Nxe5+ Kh7 36.Bf5+ Kg8 37.Qf7+ Kh8 38.Ng6# (38.Qh7#) ) 33.Be6+ White finds a smooth reply, improving immeasurably with the following combination: 33...Bxe6 34.Qxe6+ Kh8 35.Qh6+ Kg8 36.Rd4
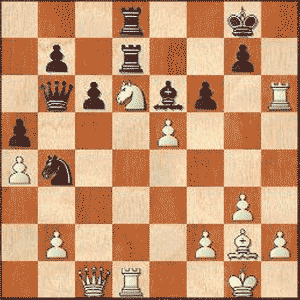
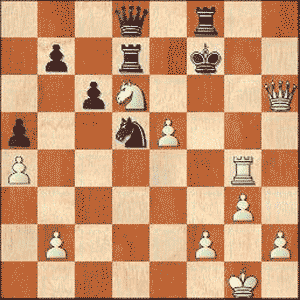
White's pieces are converging on the compromized Black King. 36...Nd5 Black frantically recalls his troops to protect the King. 37.Qe6+ Again White cleverly plays for tempi enabling his forces to move into position much faster than the defenders. 37...Kh8 It seems that in spite of
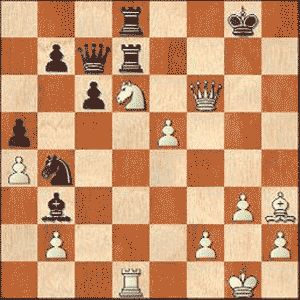
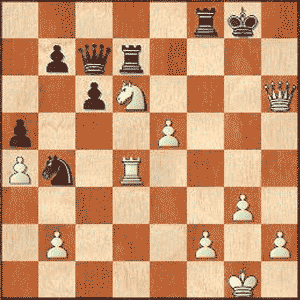
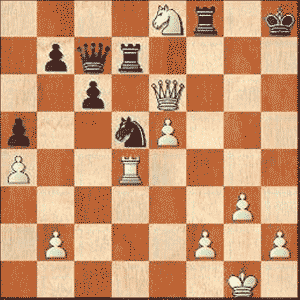
the lack of cover in front of the King, usually provided by pawns, that Black can survive nonetheless. His Queen and Rook apparently control Black's second rank and his other Rook controls the f-file. The Black Knight also covers important squares and can come closer at any time if required. White can check endlessly if he wishes but beyond this it's difficult to see how he can close the net on the Black King. And yet in this position, Krasenkow saw something. He unearthed an amazing resource in the position. 38.Ne8!!
This has a couple of subtle effects. The Queen is attacked and her removal from c7 will weaken Black's hold on his second rank. A block on g7 will now no longer hold the position with the Knight providing support to any heavy piece coming to that square. The Knight also
blocks support lines to f8 Rook along the home rank from Black's other heavies. We will soon see the significance of that. 38...Qd8 39.Qh6+ Kg8 40.Rg4+ Kf7 41.Nd6+!!
And Black resigns to this laconic but devastating move. (41.Nd6+ There's no way out for Black: 41...Rxd6 (41...Ke7 42.Rg7+ Rf7 43.Rxf7#) 42.Rg7+ Ke8 43.Qh5+ Rg6 44.Qxg6+ Rf7 45.Qxf7#) 1-0 Krasenkow - Alekseenko, Sochi (2021) P.S. If you do not have html based email software and you're using a text only system, you may find that the links are only partially highlighted and may not work. If this is the case, simply copy and paste the entire link into the browser and hit Enter. That should get you where you want to go. Comments, ideas, feedback? I'd be stoked to hear from you. Get in touch See you next month. Ken 
|
| Back to Back Issues Page |
