| Back to Back Issues Page |
 |
|
LCB, Issue #081 --, Counter-Strike with the Traxler Variation March 01, 2022 |
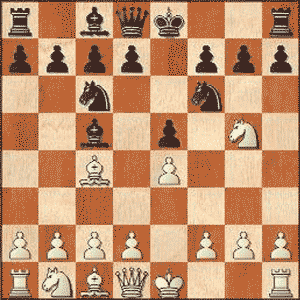
Counter-Strike with the Traxler VariationLapoc Chess Board, Issue #081 -- GOTM #51 learn and play online chess What do you do as Black in the face of an aggressive opening by White? I mean often as Black you'll find that White is simply content to develop fully before really going for an attack. But you'll also find that many players as White like to begin their attack in earnest, even before they have brought all of their pieces into the game. They're more concerned with disrupting your opening plans than with executing their own. What to do in such situations? You can either put your gloves up and carefully negotiate the traps as you hopefully achieve all your opening goals. Or you can respond in kind, suspend your opening development for a time, hit back tactically and punish White for his over-reach. This idea has materialized on chess boards all over the world for centuries through many different variations. One of the nicest opening lines you will see in this spirit is the Traxler Variation, also known as the Wilkes-Barre Variation. Let's see it in action. By none other than it's original creator. This month's game was played in Hostoun, now in Czechia, in 1890. Joerg Reinisch had White and Karel Traxler had Black. Win with a Deep Tactical StrikeReinisch, Joerg - Traxler, Karel [C57]GotM #51 - Hostoun, 1890 [Connaughton, Ken] 1.e4 King's Pawn Game 1...e5 Open Game 2.Nf3 King's Knight Opening 2...Nc6 3.Bc4 Italian Game 3...Nf6 Two Knights Defense 4.Ng5 Bc5
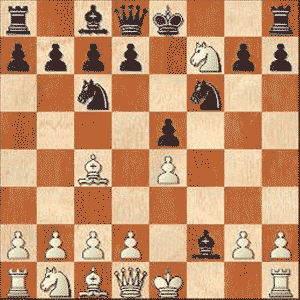
A move introduced and used a number of times in this position by Traxler, thus becoming known as the Traxler Variation. Also known as the Wilkes-Barre Variation. (4...d5 Main Line 5.exd5 Nxd5 6.Nxf7= Fried Liver Attack (6.d4 Lolli Attack 6...exd4 7.0-0 Be7 8.Nxf7 Kxf7 9.Qf3++/- with similarities to the Fried Liver Attack) 6...Kxf7 7.Qf3+=) 5.Nxf7 Bxf2+!
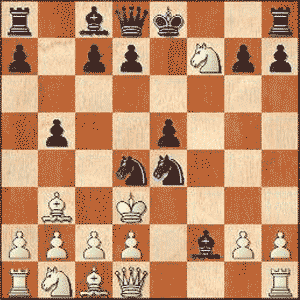
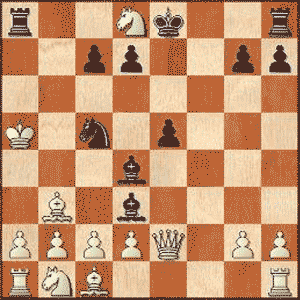
Gets an exclaimation mark as this game was played in the Romantic Era before the silicon age. Now we know that 6.Kf1 or 6.Kf2 would allow White to keep the edge he gains after Black's sacrifice on f2. But this can't have been easy to find over the board in Hostoun back in 1890. (5...Qe7 6.Nxh8 Qf8 7.Nf7 d5 8.exd5 Qxf7 9.0-0 Nxd5 10.Nc3 Be6 11.Nxd5 0-0-0+-) 6.Ke2? And now Black is in the driving seat. 6.Kf1 and 6.Kxf2 literally have a maze of possibilities that the game could have taken. (He might have done better with 6.Kf1! Qe7 7.Nxh8 Bb6 (7...a6 8.Kxf2 (8.Bf7+ Kf8 9.Kxf2 Nxe4+ 10.Kg1 Qc5+ 11.d4 exd4 12.Qf3 (12.Qd3 Ne5 13.Qxe4 Nxf7 14.Qf4 Qe7 15.Bd2 d6 16.Nxf7 Qxf7 17.Qxd4) 12...d3+ (12...d5 13.Bg6+ Kg8 (13...Nf6 14.Bxh7 Be6 15.Ng6+ Ke8 16.Nf4 Bf7 17.Nd3 Qxc2 18.Na3 Qa4 19.Bg5 (19.Bh6 Nxh7 20.Re1+ (20.Qf5 Nf8 21.Rf1 Nd8 22.Bxg7; 20.Bxg7 Ng5 21.Re1+ Ne4 22.Rf1 Nd8 23.Qf5 Qd7 24.Qh7 Qe6 25.Qh8+ Ke7 26.Qf8+ Kd7 27.Ne5+ Kc8 28.Nxf7 Kd7 29.Ne5+ Kc8) ) ) 14.Qf7+ Kxh8 15.Qe8+ Qf8 16.Qxf8#) 13.Be3) 8...Qc5+ 9.d4 Qxc4 10.d5 Nxe4+ 11.Ke1 Nb4 12.Qh5+ g6 13.Qxe5+ Kf8 14.Bh6+ Kg8 15.Qg7# (15.Qe8#) ) 8.Bf7+ Kd8 9.Bb3 d5 10.d3 Bg4 11.Qd2 Nd4 12.exd5 Kd7 13.Ba4+ c6 14.dxc6+ bxc6 15.c3 Nh5 16.h4 Ne2 17.Qg5 Qf8+ 18.Bf4 Neg3+ 19.Ke1 Qxf4 20.Qxf4 exf4 21.Bd1 Bxd1 22.Kxd1 Nxh1 23.Nf7 Re8-+; Or 6.Kxf2! Nxe4+ 7.Ke3 Qh4 8.Nxh8 (8.g3 Nxg3 9.hxg3 Qd4+ 10.Kf3 d5 11.Nxh8 (11.Rh4 e4+ 12.Kg2 0-0 (12...dxc4?? 13.Nxh8 Bf5 14.Nc3 0-0-0 15.Nf7 Re8 16.Rf4 Bg6 17.b3 Kb8 18.Qf1 Nb4 19.bxc4 Nxc2 20.Rb1 Qd3 21.Qxd3 Ne1+ 22.Kg1 Nxd3 23.Rf1 b6+-) 13.Nc3 Qxc4 14.d3 Qc5 15.Qh5 Ne7 16.Qxh7+ Kxf7 17.Rf4+ Bf5 18.d4 Qxd4 19.Rxf5+ Nxf5 20.Qxf5+ Kg8 21.Qxd5+ Qxd5 22.Nxd5+/-) 11...Bg4+ 12.Kg2 Qe4+ 13.Kh2 Bxd1) 8...Qf2+ (8...Qf4+ 9.Ke2 (9.Kd3 Nb4+ 10.Ke2 Qf2#) 9...Qf2+ 10.Kd3 Nb4+ 11.Kxe4 Qf4#) 9.Kxe4 d5+ 10.Bxd5 a)10.Kd3 dxc4+ 11.Kxc4 Qd4+ 12.Kb5 (12.Kb3 Qb4#) 12...a6#; b)10.Kxd5 Qd4#; 10...Bf5#) 6...Nd4+ 7.Kd3?? A second poor choice on the bounce and now White is lost. 7.Kf1 or even 7.Kxf2 were better but we can understand the difficulties of negotiating this chaotic position in the heat of battle. The game is very sharp. (7.Kf1+/=; 7.Kxf2-/+) 7...b5! Most reasonable people would have chosen to preserve the Lady but Traxler wants to keep the attack going, confident that he does not need her. 8.Bb3 Reinisch wisely resists the urge to collect the Black Queen. (After 8.Nxd8 White finds himself open to ideas similar to those that later emerge in the game: 8...bxc4+ 9.Kxc4 Ba6+ 10.Kb4 Rb8+ 11.Ka5 Be2 12.Qxe2 Nxe2-+ with Black's advantage decisive.) 8...Nxe4!!
White insists on the Queen sacrifice. (8...Qe7 was also decent and perhaps the path that most of us would take. Black would win but it would take much longer. Possibly after something like 9.c3 d5 10.cxd4 exd4 11.Nc3 dxc3 12.Kc2 cxd2 13.Qe2 dxc1Q+ 14.Raxc1 0-0 15.Ng5 c5 16.Rcf1 c4 17.Rxf2 Bg4 18.Qd2 cxb3+ 19.Kb1 dxe4 20.Rff1 h6 21.Nh3 e3 22.Qd3 bxa2+ 23.Kxa2 Be6+ 24.Ka1 Bc4 25.Qa3 Qxa3+ 26.bxa3 Bxf1 27.Rxf1 Ng4 28.Re1-+ after which Black should prevail.) 9.Nxd8 (9.Nxe5 was the least worst option: 9...Qg5 10.Bf7+ Kd8 11.b4 Qxe5-+; Not 9.Kxe4?? d5+ 10.Kd3 Bf5+ 11.Kc3 c5 12.Nd6+ Kf8 13.Nxf5 b4+ 14.Kd3 e4#) 9...Nc5+ Black's got bigger fish to fry than the d8-Knight. 10.Kc3 Ne2+!
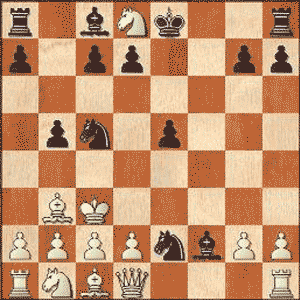
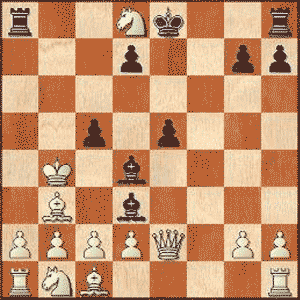
Another sacrifice and a forced one at that. 11.Qxe2 (White daren't decline with 11.Kb4 as the end would come quick: 11...a5+ 12.Kxb5 Ba6+ 13.Kxa5 Bd3+ 14.Kb4 Rb8+ 15.Ka5 (15.Nb7 doesn't change anything, 15...Rxb7+ 16.Ka3 Ra7+ 17.Kb4 Na6+ 18.Ka3 Bc5+ 19.Ka4 Nb8# (19...Nb4#) ) 15...Rb5#) 11...Bd4+ 12.Kb4 The White King having left his camp is now compelled further forward. 12...a5+ 13.Kxb5 Ba6+ 14.Kxa5 Bd3+!?
The result is not in doubt but Traxler's moves demonstrate a deep knowledge of the possiblities in the position as he sacrifices with wild abandon to find the quickest #. Anyone else would have taken the Queen but Black is equally confident leaving her on the board for mere artistic effect as he was jettisoning his own Queen a couple of moves earlier. (14...Bxe2+ is just as good but lacks the sheer pinache of the text move. 15.Kb4 Na6+ 16.Ka5 Nb8+ 17.Kb4 c5#) 15.Kb4 After White flees the discovery Black activates the mating net quickly. 15...Na6+ 16.Ka4 Nb4+ Yet another sacrifice. (The less flashy 16...Nb8+ also works: 17.Kb4 c5#) 17.Kxb4 c5#
And to finish it poor old White is
mated by a pawn. 0-1 Reinisch - Traxler, Hostoun (1890) P.S. If you do not have html based email software and you're using a text only system, you may find that the links are only partially highlighted and may not work. If this is the case, simply copy and paste the entire link into the browser and hit Enter. That should get you where you want to go. Comments, ideas, feedback? I'd be stoked to hear from you. Get in touch See you next month. Ken 
|
| Back to Back Issues Page |
