| Back to Back Issues Page |
 |
|
LCB, Issue #090 --, Behold the Queen Sacrifice December 01, 2022 |
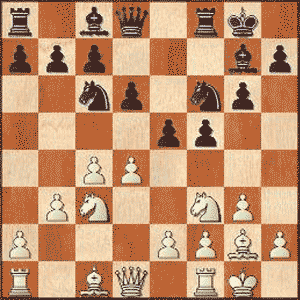
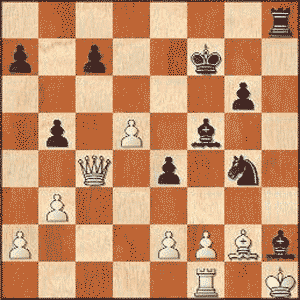
Behold the Queen SacrificeLapoc Chess Board, Issue #090 -- GOTM #60 learn and play online chess You're about to sac a piece. You can see you're going to have a good situation, a lot of play in the position afterwards? But will it be enough to give you winning chances? It's a big gamble. If you don't gain a won position it will backfire in the long run. Your opponent might hang in there, repel the attack, slowly rally and then come into the game. And now he has an extra piece. That should mean you're going down. So everything rides on your compensation. Was the sacrifice the correct decision? It takes a lot courage to sacrifice a pawn or two, a minor piece or even a Rook. Some people love the buzz of sacrificing material for a strong attack. So they'll happily sac those pieces. Sacrificing a Queen however is a different level again. These sacrifices make for really exciting games. Hopefully this month's game will inspire you to play a Queen sacrifice. Aix Les Bains in the French Riviera set the scene for this clash in 2007 between the Swiss, Robert Fontaine and Frenchman, Maxime Vachier Lagrave. The game was played with a sacrificial vibe all the way through to a stunning finale. Behold the Queen SacrificeFontaine, Robert - Vachier Lagrave, Maxime [A89]GotM #60 - Aix Les Bains, 2007 [Connaughton, Ken] 1.Nf3 f5 Dutch Defense 2.d4 Nf6 3.g3 g6 Leningrad Variation 4.Bg2 Bg7 5.0-0 0-0 6.c4 d6 7.Nc3 Nc6 8.b3 e5
Black's main objective in the opening. 9.dxe5 dxe5 These two pawns on e5 and f5 are the main assets in Black's position. There is a trade off of course. White's pieces will be quite active. 10.Ba3 e4!? Allowing the exchange sacrifice. Black's compensation will come in the form of his unopposed dark square Bishop on g7, dominating the long diagonal. (10...Re8 is the usual continuation.) 11.Bxf8 Qxf8 12.Nd4 Nxd4 13.Qxd4 Be6 14.Qd2
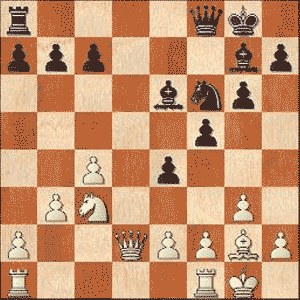
White pulls his Queen out of the firing line of the fianchettoed Bishop. He has to get his Rooks active in order to make the most of his advantage in material. 14...h5!? Instead of contesting the d-file, Black embarks on a flank attack. It is possibly dubious but only if White responds in the correct way. (14...Rd8 would have tempted most players with Black.) 15.Rad1 Securing control in the center. 15...h4 16.Qg5 Attacking g6 and keeping an eye on Black's attack but there were better moves available for White. (16.Nb5 Qc5 17.Qf4 Ne8+/-; 16.gxh4 a6 17.e3 Qe7 18.Ne2 Bf7 19.Nf4+/-) 16...Kf7 17.Qf4 (17.Qxh4) 17...Qc5 18.Nb5 White finally arrives in position to threaten c7 but Black has had time to prepare a good defense. 18...hxg3 19.hxg3 Rc8 20.Nd4 Bd7 21.g4? Designed to tear away the Black King's cover but this move harms White's position more. (21.Nc2) 21...Nxg4 22.Nxf5!?
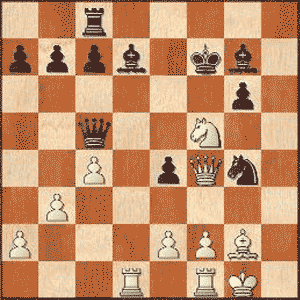
White thinks he has found a winning resource. (22.Bxe4 Be5 (22...Bxd4?? 23.Rxd4 Qxd4 24.Bd5++-) 23.Qf3 Bxd4=) 22...Bxf5 (22...Qxf5? 23.Rxd7++-) 23.Rd5 The idea is that White will fork a hanging Rook after the exchange sac and come out of the combination winning
a minor piece. 23...Qxd5!!
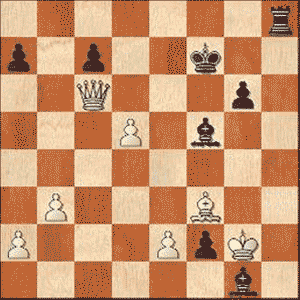
He gives up the Queen, ending White's attack and setting in train an explosive attack for himself. (23...Qf8 of course would hold the position for Black after 24.Rxf5+ gxf5 25.Qxf5+ Nf6 but in the game he responds with a violent tactic of his own.) 24.cxd5 White must accept. 24...Be5 Now we can see that Black's pieces are co-ordinating beautifully. 25.Qc1 The Queen must retreat but White wants to keep pressure on c7 with hopes of a draw by perpetual check. 25...Bh2+ 26.Kh1 Rh8 with the deadly threat of ...Bf4+ winning the Queen. White will have to put the Queen on a light square so she
is safe from the Bishop in a discovery check. 27.Qc4 Keeping an eye on c7 and also threatening d6+ at any time. 27...Bd6+ 28.Kg1 Bh2+ 29.Kh1 b5!
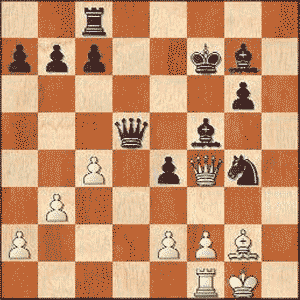
This sacrifice is tempting the Queen away from control of the checking squares to a less useful location. 30.Qxb5? The losing move. (30.Qc6 would have retained White's drawing chances by tying the dark square Bishop to the defense of the pawn. 30...e3 31.Bf3 Nxf2+ 32.Rxf2 exf2 33.Kg2 and here the crucial difference from the game is instead of playing 33...Bg1 as he would like, Black must play 33...Bg3 to hold c7 but even still, after 34.Kxg3 f1Q 35.Qxc7+ the Black King can't escape the checks. It's a draw.) 30...e3! White can't take. 31.Bf3 The best. (31.fxe3? Bf4+ 32.Kg1 Bxe3+ 33.Rf2 Bxf2+-+) 31...Nxf2+ 32.Rxf2 White has little option but to give back the exchange. (32.Kg2? Bh3+ 33.Kxh2 Bd7+-+) 32...exf2 33.Kg2 and now thanks to White's misplaced Queen Black can play 33...Bg1 34.Qc6??
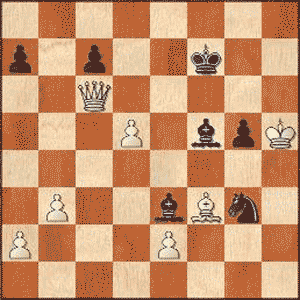
The right square for the Queen but a day late and a dollar short. That ship has sailed. Now this move gives Black the chance to launch an ingenious mating attack. (Better was 34.Kf1 Rh2 (34...Bh3+?? 35.Bg2 Bxg2+ 36.Kxg2 Rh5+-) 35.Bg2 Rxg2 36.Qc6 Rh2 37.Qxc7+ Kf8 38.Qd8+ Kg7 39.Qc7+ Kh6 40.Qf4+ Kh5 41.Qe5 pinning the Bishop (Black wants to get in ...Bh3#). 41...Rh4 42.Qh8+ Kg5 43.Qd8+ Kg4 44.Qf6 Rh7 45.Qe5 Rh3-+) 34...Rh2+ and not the immediate ...Bh3+. 35.Kg3 f1N+!! The only way to win and the forced # is still on track. (35...f1Q?? would have allowed White to draw: 36.Qxc7+ Kg8 37.Qd8+ Kg7 38.Qe7+ Kh6 39.Qf8+ Kg5 40.Qe7+ Kh6 41.Qf8+ Kg5 42.Qe7+ Kh6 43.Qf8+ Kg5 44.Qe7+=) 36.Kf4 Rh4+ 37.Kg5 Be3+!! Yet another inspiration calculation! Black keeps the mating attack going by sacrificing his Rook which White is forced to take. 38.Kxh4 g5+ 39.Kh5 Ng3+
and White, seeing the end, resigns here. Amazing. (39...Ng3+ Of course after White's only possible continuation: 40.Kh6 g4# ends the game. All four of Black's pieces working together to give #.) 0-1 Rapport - Sebenik, Austrian Ch., (2013) P.S. If you do not have html based email software and you're using a text only system, you may find that the links are only partially highlighted and may not work. If this is the case, simply copy and paste the entire link into the browser and hit Enter. That should get you where you want to go. Comments, ideas, feedback? I'd be stoked to hear from you. Get in touch See you next month. Ken 
|
| Back to Back Issues Page |