| Back to Back Issues Page |
 |
|
LCB, Issue #100 --, Tame Alekhine's Bucking Bronco October 01, 2023 |
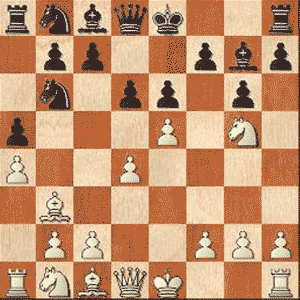
Tame Alekhine's Bucking BroncoLapoc Chess Board, Issue #100 -- GOTM #70 learn and play online chess The Alekhine Defense is a very different answer to 1.e4 that Black can reach for. It's a counter-intuitive flex. Breaking all the rules of good opening strategy, you move a single Knight round the board for several moves as White continues to push pawns that jab at the wandering horse. You're making no progress with your development while White builds an intimidating looking center at the gates of your camp. His minor pieces, all of them, are also all ready to come into the game. This can only lead to disaster right? Well a fellow called Alexander Alekhine reckoned not. His argument was that White's advanced center was vulnerable and a target for Black's forces. In his expert hands, the Black pieces many times orchestrated the fall of that center and with it the game. One of Alekhine's successors, Garry Kasparov handled the White pieces against the Alekhine Defense and showed that both sides have chances and it really comes down to who makes the most of the elements thrown up by this strange but beautiful opening. This month's game sees Kasparov with the White pieces and Semon Palatnik choosing the Alekhine Defense with the Black pieces. The game was played in Daugavpils in 1978. It developed into a wonderful fight. Tame Alekhine's Bucking BroncoKasparov, Garry - Palatnik, Semon [B04]GotM #70, Daugavpils, 1978 [Connaughton, Ken] All of the variations for this game were provided by Chessbase. I'm not sure who the author was. Anyways cheers Chessbase!! 1.e4 King's Pawn Game 1...Nf6 Alekhine Defense 2.e5 Nd5 3.d4 d6 4.Nf3 Modern Variation 4...g6 5.Bc4 Nb6 6.Bb3 a5 7.a4 Stopping the charge on his Bishop (7.e6 Bxe6 8.Bxe6 fxe6 9.Ng5 Nc6 10.Nxe6 Qd7 11.Qe2)
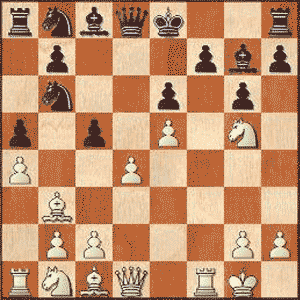
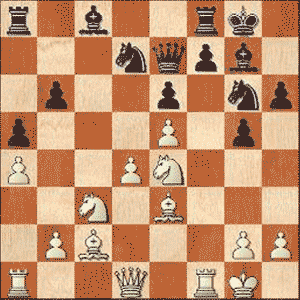
(8...d5 9.0-0 0-0 10.Re1 Nc6 11.c3 f6 12.exf6 exf6 13.Ne6+/=) 9.f4 (9.Qf3 Qe7 10.Ne4 dxe5 11.Bg5 Qb4+ 12.Nbd2 exd4 (12...Qxd4 13.0-0-0->)13.c3->) 9...dxe5 10.fxe5 c5 11.0-0?!
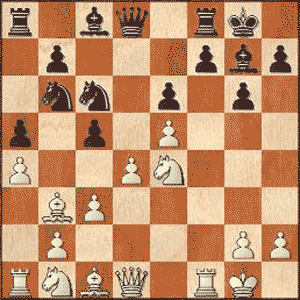
(11.c3 >= 11...cxd4 12.0-0!) 11...0-0?! (11...Qxd4+! 12.Qxd4 cxd4 13.Rxf7 (13.Nxf7 0-0 14.Nd6 Rxf1+ 15.Kxf1 Bd7 16.Nxb7 Na6!)13...Bxe5 14.Rf1 Nc6=) 12.c3 Nc6? (12...cxd4() 13.cxd4 Nc6 14.Nf3 f6 15.Nc3!? fxe5 16.Bg5 Qe8 17.dxe5 Nxe5 18.Nxe5 Rxf1+ 19.Qxf1 Bxe5 20.Re1 Bd4+ 21.Kh1N) 13.Ne4!
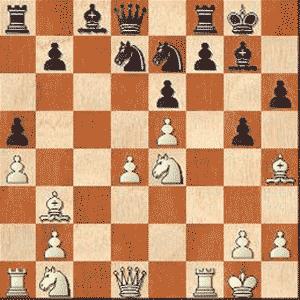
13...Nd7 (13...cxd4 14.Bg5 Qd7 (14...Qc7 15.cxd4)15.Nf6+ Bxf6 16.Bxf6 dxc3 17.Qc1+-) 14.Be3! (14.Bg5 Qb6 15.Nf6+ Kh8 16.Rf4 cxd4 17.Rh4 Bxf6 18.exf6 dxc3+ 19.Kh1 cxb2 20.Ra3 Qc5-+) 14...Ne7 Black's light squares are rock solid and he still has his King's Bishop to fend of threats on the dark squares. (14...Qb6 15.Na3 (15.Bf2)15...cxd4 16.Nc4) 15.Bg5 cxd4 (15...h6 16.Bh4 g5 17.Bxg5! hxg5 18.Qh5+-) 16.cxd4 h6 17.Bh4 g5
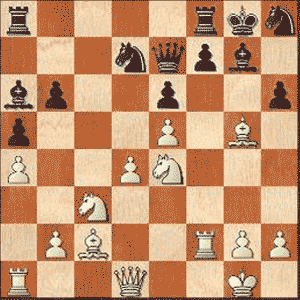
Black drives the Bishop away at the cost of loosening his defensive shell a little. 18.Bf2 (18.Bxg5? hxg5 19.Qh5 Nxe5!) 18...Ng6 19.Nbc3 Qe7 20.Bc2 b6 21.Be3
White is re-orienting his pieces for a second wave. 21...Ba6 22.Rf2 Nh8 23.Bxg5!
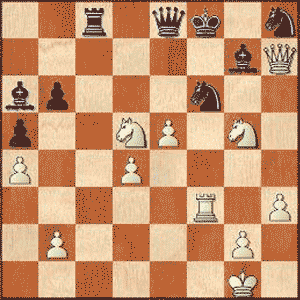
And White gives up a Bishop to further weaken the defense. (23.h4 gxh4 24.Qg4! f5 (24...Ng6 25.Qh5)25.exf6 Nxf6 26.Nxf6+ Rxf6 27.Rxf6 Qxf6 28.Qe4! Rd8 29.Qh7+ Kf8 30.Nb5+-) 23...hxg5 24.Qh5 With the Knight poised to take on g5, the Bishop sacrifice looks like a good investment. A strong attack is imminent. 24...f5 (24...f6 25.Nxg5 Rfc8 26.Bh7+ Kf8 27.Nce4+-) 25.Nxg5 Rf7! Black offers an exchange sacrifice as a tacit draw proposal. (25...Rfd8 26.Rxf5!+-; 25...Rfc8 26.Qh7+ Kf8 27.Nxe6+ Qxe6 28.Bxf5) 26.Bxf5!!
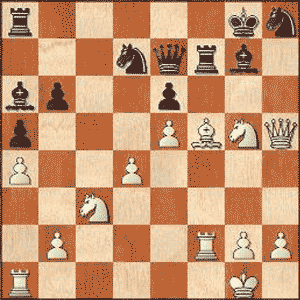
A second Bishop sacrifice is a total rejection of the truce. 26...Rxf5 (26...exf5 27.Nd5 Qe8 28.e6 Rf6 29.Qh7+ Kf8 30.e7++-) 27.Rxf5 exf5 So White now has given up his Bishop pair for three pawns and for this he has a dangerous attack on the now exposed Black King. His pieces are also much better than their more numerous Black counterparts. 28.Nd5 Qe8 Only move to stop #. 29.Qh7+ Kf8 30.Qxf5+ The attack is being waged with skill and ferocity. Black's cover is being systematically removed as White continues to advance with tempo. 30...Kg8 (30...Nf7 31.Ne6+ Kg8 32.Qg6+-) 31.Qh7+ Kf8 32.Ra3!
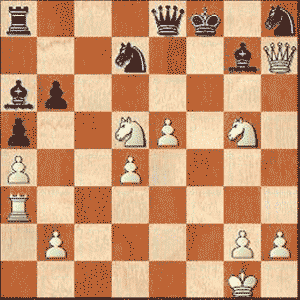
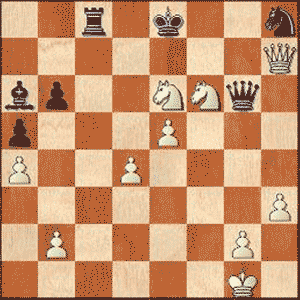
And the last White piece is readied to join the attack against the King who has no flight path away from the dangerous corner he finds himself in. (32.Nc7) 32...Rc8 Black tries to activate his Rook so that maybe it can be used in defense or attack. (32...Qg6 33.Rf3+ Ke8 34.Qg8+ Bf8 (34...Nf8 35.Rxf8+! Bxf8 36.Nf6+)35.Nc7+ Kd8 (35...Ke7 36.Rf7+!)36.Nce6+ Ke7 (36...Kc8 37.Rxf8+)37.Qxg6 Nxg6 38.Rf7+ Ke8 39.Nc7+ Kd8 40.Nge6+ Kc8 41.Nxa8+-) 33.Rf3+ The King has nowhere to go so another piece will have to take the bullet. 33...Nf6 It's the Knight, the Bishop is defending the h8-Knight and throwing the Queen on the grenade is clearly not wise. (Not the other Knight because 33...Nf7 34.Rxf7+ Qxf7 35.Nxf7 Rc1+ 36.Kf2 Rf1+ 37.Kg3 Rxf7 38.Qh4!+-) 34.h3!
(34.Rxf6+ Bxf6 35.Nxf6 Rc1+ 36.Kf2 Qg6 37.Qxh8+ Ke7 38.Nd5+ Kd7 39.e6++-) 34...Qg6 Exchanging Queens would clearly aid Black's defensive efforts. 35.Rxf6+ A nice way to avoid the exchange of Queens. 35...Bxf6 36.Ne6+ Ke8 37.Nxf6+
And Black, having seen enough attacking magic, resigns. (37.Nxf6+ Qxf6 38.exf6 Nf7 39.Qg8+ Kd7 40.Qxf7+ Kd6 41.Qe7+ Kd5 And White with 42.Nc7+ or 42.f7 has a clearly won game.) 1-0 Kasparov, Garry - Palatnik, Semon [B04] P.S. If you do not have html based email software and you're using a text only system, you may find that the links are only partially highlighted and may not work. If this is the case, simply copy and paste the entire link into the browser and hit Enter. That should get you where you want to go. Comments, ideas, feedback? I'd be stoked to hear from you. Get in touch See you next month. Ken 
|
| Back to Back Issues Page |
