| Back to Back Issues Page |
 |
|
LCB, Issue #101 --, Bob and Weave in the Danish Gambit November 01, 2023 |
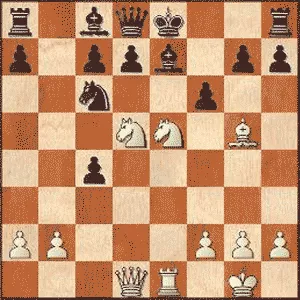
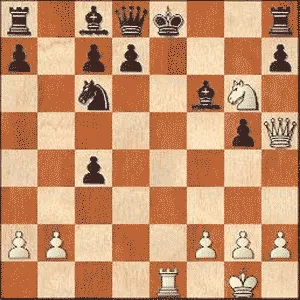
Bob and Weave in the Danish GambitLapoc Chess Board, Issue #101 -- GOTM #71 learn and play online chess I'm going to be honest. It irritates me when my opponent starts setting problems for me in the very early stages. You haven't even developed yet and your already attacking! I always feel a little slighted. This kind of thing deserves to be punished. And you know something, most of the time in these games, I make a mistake and let it slip. And lose the kind of game I most hate to lose. It really frustrates me. How do you best handle a dangerous opening gambit? Do you concentrate hard, make no mistake and defend very precisely for a long time until the pendulum swings your way. Or do you try something else. How about you go on a crazy attack of your own, right there in the opening? That's what Frederick K. Young did against L. Dore when the two played in Boston in 1892. This month we will see what happened next. Bob and Weave in the Danish GambitYoung, Franklin K. - Dore, L. [C21]GotM #71, Boston, 1892 [Connaughton, Ken] 1.e4 King's Pawn Game 1...e5 Open Game 2.d4 Center Gambit 2...exd4 Center Game 3.c3 Danish Gambit 3...dxc3 Black helps himself to another pawn, partially accepting the Danish Gambit 4.Bc4 White offers another pawn and with it the chance for Black to enter the full blown Danish Gambit 4...Nf6 Black denies the full Danish, satisfying himself with one pawn and turning his attention to development (Black could have went full Danish and taken another pawn with 4...cxb2 , which would have led to 5.Bxb2 giving White a powerful Bishop Pair for the two pawns and Black has only one good move. Believe it or not, 5...d5 which at first looks really unwise. However it is necessary to give one of the pawns back, develop quickly and challenge the White Bishops on the long diagonals. None of the alternatives hold good statistics for Black. (5...Bb4+; 5...Nf6; 5...d6; 5...Nc6; 5...Qe7; 5...Qg5)The Main Line continues: 6.Bxd5 Nf6 7.Bxf7+ Kxf7 8.Qxd8 Bb4+ 9.Qd2 Bxd2+ 10.Nxd2= with roughly even chances) 5.Nf3 Continuing in his sacrificial approach, White allows another pawn to drop, preferring to get his pieces into the game 5...Nxe4 6.0-0 Nd6 e4 is unlikely to remain hospitable for long so Black moves his Knight again. He does at least threaten the White Bishop from his new vantage point. 7.Nxc3?!
A questionable sacrifice but one that might send the game in one direction or other depending on who plays better 7...Nxc4 Black takes the piece, yet again moving the Knight. From a material point of view, he has a nice lead but look at the development race. 8.Re1+ Be7 9.Nd5 And the Bishop will come under fire. It's the nature of these situations that the defense has three concerns, firstly that material losses may result, passivity of the defending pieces contrasting with the activity of the attacking pieces and thirdly the safety of the King. 9...Nc6 10.Bg5 f6 Black seems to have defended all of his concerns pretty well. 11.Rc1 b5 12.Rxc4?
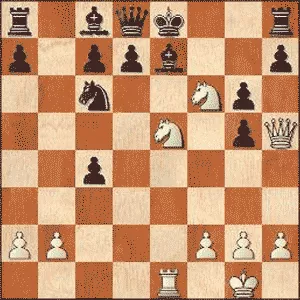
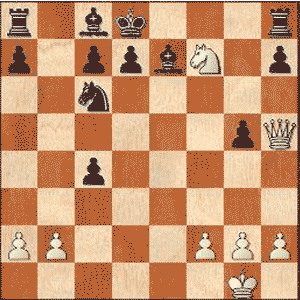
Have to question this sacrifice as objectively it loses the game. The onus is on Black to find the path to victory. 12...bxc4 13.Ne5!
He must continue in this vein and like the other sacrifices in this game, it is very daring. 13...fxg5?? Black decides that the Bishop is the one that needs to be eliminated. This error converts a healthy advantage for Black into a decisive advantage for White. His conversion of this advantage is as instructive in the art of tactics as it is beautiful. (It would have been better to see off the far more dangerous Knight: 13...fxe5 14.Nxe7 Nxe7 15.Rxe5 Rf8 16.Bxe7 Qxe7 17.Rxe7+ Kxe7-+) 14.Qh5+ g6 15.Nf6+!
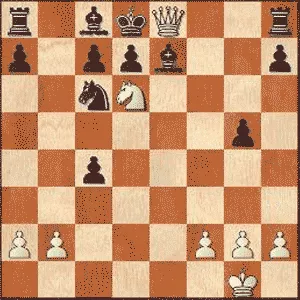
Nice tactical idea as White sacrifices yet another piece. He's all in now. If this attack doesn't work he will go under. (15.Nxg6? would yield only a draw through perpetual check for White: 15...hxg6 16.Qxh8+ Kf7 17.Qh7+ Kf8 18.Qh8+ Kf7 19.Qh7+=) 15...Bxf6 16.Nxg6+
The discovery paralyzes Black 16...Qe7 (16...Kf7 The Queen sacrifice was necessary as the flight of the King would ultimately fail: 17.Ne5+ Ke6 18.Qf7+ Kd6 (18...Kf5 19.g4+ Kf4 20.Qd5 Nxe5 21.Qe4#)19.Rd1+ Kc5 (19...Kxe5 20.Qd5+ Kf4 21.f3 Bd4+ 22.Rxd4+ Nxd4 23.Qe4#)20.Qxc4+ Kb6 21.Qb3+ Ka6 22.Qd3+ Kb6 23.Nc4+ Kc5 24.Qd5+ Kb4 25.Na3 Rb8 26.Nc2+ Ka4 27.b3+ Rxb3 28.axb3#) 17.Rxe7+ This move is the sacrificial finale and his availing of this option is evidence he saw and planned the mating attack from 15.Nf6+ because the presence of this possibility is the only justification for the relentless liquidation of White's forces. (17.Nxe7+ may be a road taken by a less all-seeing operator. 17...Kf8 18.Nxc6 dxc6 19.Re8+ Kg7 20.Rxh8 Kxh8 21.Qf7 Bd7 22.Qxf6+ Kg8 23.Qxg5+ Kh8 24.Qc5+-) 17...Bxe7 18.Ne5+ (18.Nxh8+ Even quicker but not quite as beautiful: 18...Kd8 19.Nf7+ Ke8 20.Nd6+ Kf8 (20...Kd8 21.Qe8#)21.Qf7#) 18...Kd8 19.Nf7+
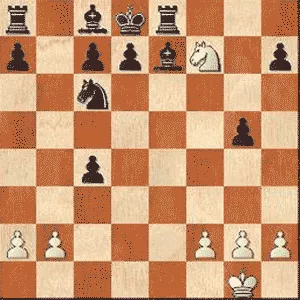
And the game will conclude with a very picturesque idea that usually plays out in the corner of the board. The King's Bishop and c and d-pawns block the King's flight path, simulating a corner in the middle of the board and thus making this plan possible. 19...Ke8 20.Nd6+ Kd8 21.Qe8+!
And here's an idea you may know, forcing the Smothered Mate with the Queen sacrifice. 21...Rxe8 22.Nf7#
And the Smothered Mate in the center of the board gives a particularly pleasing finish. Black's two Rooks and three minor pieces lose miserably to White's lone Knight. 1-0 Young, Franklin K. - Dore, L. [C21] P.S. If you do not have html based email software and you're using a text only system, you may find that the links are only partially highlighted and may not work. If this is the case, simply copy and paste the entire link into the browser and hit Enter. That should get you where you want to go. Comments, ideas, feedback? I'd be stoked to hear from you. Get in touch See you next month. Ken 
|
| Back to Back Issues Page |