| Back to Back Issues Page |
 |
|
LCB, Issue #039 --, Sacrifice to Get to a Central King August 01, 2018 |
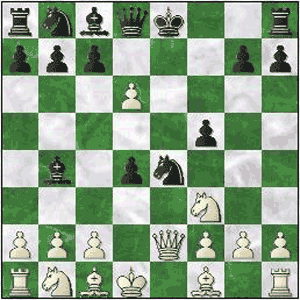
Sacrifice to Attack a Central KingLapoc Chess Board, Issue #039 -- GOTM #8 learn and play online chess Maguire faces King in 1896 and chooses the Petrov Defense. He demonstrates the tactical potential in this opening as he quickly gets a dynamic position. He sees that his opponent hasn't castled and swiftly deploys his pieces in an effort to tear open the cover around the King. Using some clever pins and quick development, he plays 3 great sacrifices and then ruthlessly hunts down the beleaguered enemy King. Sacrifice to Get to a Central KingKing, Samuel Thomas - Maguire, Elihu S [C43]GotM #8 - Continental CT, 1896 1.e4 e5 2.Nf3 Nf6 Petrov Defense 3.d4, played regularly but not as common as the other two. (3.Nxe5 The main move.; 3.Nc3 also popular) 3...exd4 (3...Nxe4 is usually played but the text move is the other main idea. 4.Bd3 d5 5.Nxe5) 4.e5 And now the point, White kicks the Knight. 4...Ne4 5.Qe2 Bb4+ 6.Kd1 (If White wants to keep castling rights, then 6.Nbd2 Nxd2 7.Bxd2 Qe7 (7...Bxd2+ 8.Qxd2)) 6...d5 7.exd6 f5
Black is winning space but is his position stable? 8.dxc7 Qxc7 9.Nxd4 Nc6 10.Be3 (10...Nbxc6 is played only on the rare occasion. The e7-Knight does not look comfortable here.) 10...Bd7 (10...f4 might be followed by 11.Nxc6 Qxc6 12.Bd4 Be6 13.c3) 11.c3 White is trying to close the gates but Black can get to his King. 11...Nxd4 12.Bxd4 Ba4+
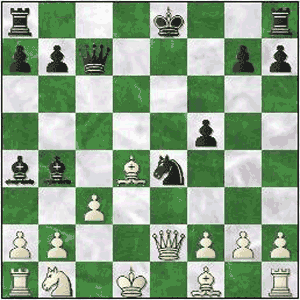
13.Ke1 (13.b3 0-0-0 14.Qc4 Nxc3+ 15.Kc2 Qxc4 16.Bxc4 Rxd4) 13...0-0-0 Black is fully developed and White's King is trapped in the center. He doesn't want to open the position by taking the Bishop. His own Bishop on d4 is now hanging as the c3-pawn is pinned. 14.Qd3 White supports his Bishop rather than open the road to his King. 14...Rxd4 First comes the exchange sac. 15.Qxd4 Rd8!
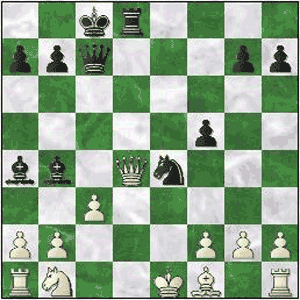
Black has forced it open by giving back the minor piece making it a full Rook sacrifice. No price is to great to get to the vulnerable King. 16.Qxb4? is hard to turn away from but now Black can force #. (16.Qxe4 is less appetizing but keeps White alive for longer. Ultimately the game is lost in any event. 16...fxe4 17.Nd2 etc.) 16...Rd1+ (16...Qf4 17.Qxb7+ Kxb7 18.Ba6+ Kxa6 19.f3 Qe3+ 20.Kf1 Rd1#) 17.Ke2 Ng3+! Another piece goes on the fire. Note that the light
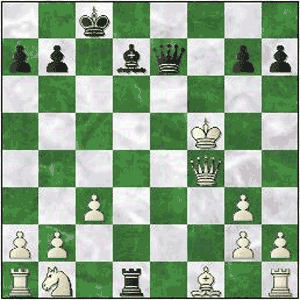
square Bishop is still hanging. 18.fxg3 Qe5+ 2 Rooks and 2 Minor Pieces vs 1 Rook and 1 Minor Piece. But White's King is horribly exposed and none of his aforementioned pieces are actually developed. 19.Kf2 Qe1+ And now the King is forcibly marched up the board away from the safety of his camp as his army watches on helplessly, unable to act. 20.Kf3 (20.Kg1 Qe3#) 20...Bc6+ 21.Kf4 Qf2+ 22.Kg5 Qe3+ 23.Qf4 The White Queen tries to intervene but Black has resources up his sleeve. 23...Qe7+ 24.Kxf5 (24.Kh5 Be8#) 24...Bd7#
as Black wins with a remarkable final position. 0- 1 King - Maguire (Continental CT, 1896) P.S. If you do not have html based email software and you're using a text only system, you may find that the links are only partially highlighted and may not work. If this is the case, simply copy and paste the entire link into the browser and hit Enter. That should get you where you want to go. Comments, ideas, feedback? I'd be stoked to hear from you. Get in touch See you next month. Ken 
|
| Back to Back Issues Page |


